
Import transaction information into your admin portal to quickly and easily keep track of transactions that have occurred outside your portal!
Download Import Template
To import a list of transactions, click your organization's name at the top left of your portal, then select Data Import. On the Cash, Check, Credit, ACH, or Other tile, click the Download Template link.
This puts a .csv template into your downloads folder. Open the template in a spreadsheet program (like Excel).
Completing Template
It is important the data you place in your file is in the same order and compliant with the guidelines in the template, and described in this article. This mock .csv file already has sample data to show you what ideal information will be needed to complete your import. Each column has a header and a second row that explains what information should be included in the column. An asterisk ( * ) indicates what columns are required, and the plus (+) indicates one field in a group is required. For example, only a Profile GUID, a Profile Custom ID, or an Organization ID is required, and only a Fund ID, an Appeal ID, or a Pledge ID is required.
Enter the transaction information for each column according to the guidelines provided in row 2. Fill in one row per transaction and delete the helper text in row 2 and all sample data. Leave only the header row from the original template and the transaction information you'd like to import.

-
Transaction ID: A transaction ID must be numeric with a maximum of 10 digits. It may match an existing, non-imported, transaction in the portal. Transactions with the same ID are differentiated by their source, which can be Import, Form, Web, or Portal.
-
Profile GUID or Profile Custom ID:
-
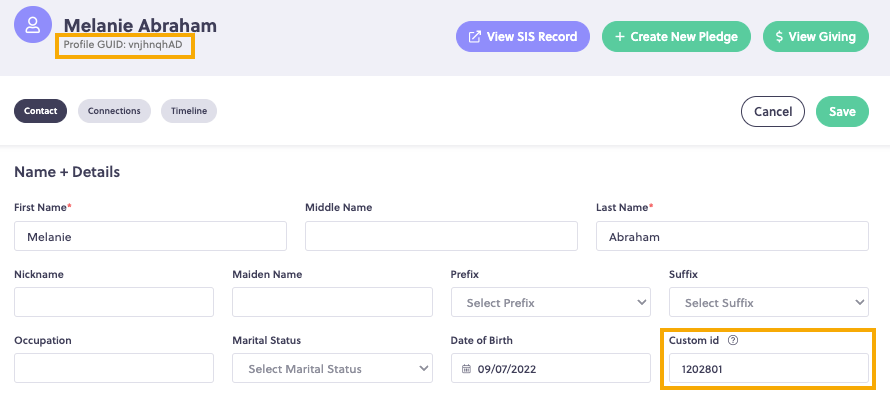
A profile GUID or Custom ID is important to include in your import to identify the person who made the transaction. The custom ID is a unique ID from an external system that has already been imported into the FACTS portal. The profile GUID is the profile's unique ID in the FACTS portal, and is displayed on the FACTS profile details page shown below.
-
-
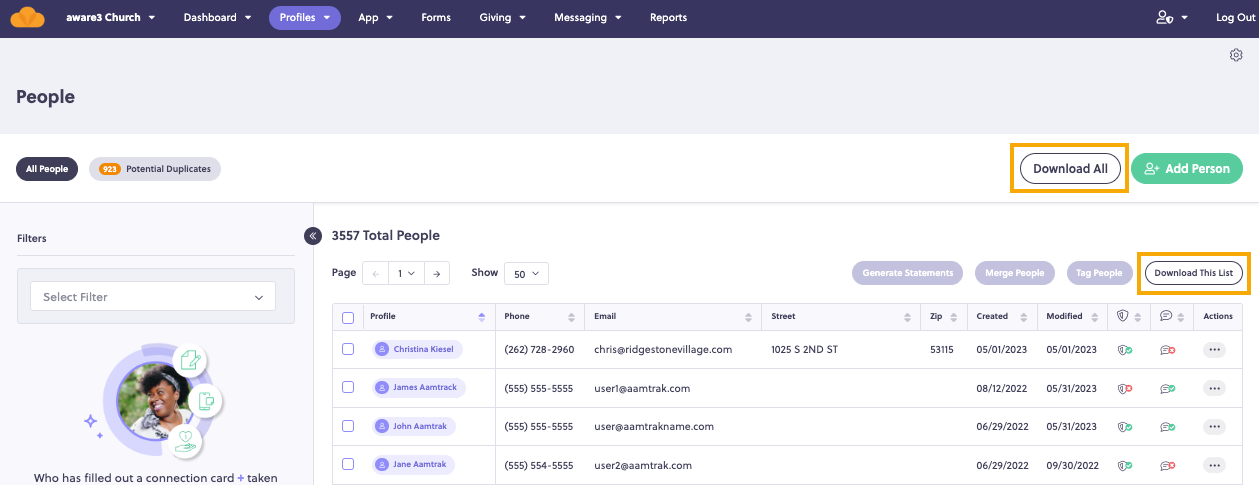
- A list of Profile GUIDs can also be obtained from a downloadable .csv file in the Profiles > People page in the portal. Create a filtered list and then click the Download this List button for a select number of profiles, or click the Download All button for all the profiles in your portal.
- Organization ID: Just like profile GUID and custom ID, an Organization ID Should be included to associate the transaction with an organization profile rather than a person profile.To find this information, go to the Profiles > Organization page in the portal. It can be found under the column titled Organization ID.
*Note: A Profile GUID, Profile Custom ID or an Organization ID is required for every transaction
- Type: This is the type of transaction that occurred. The import will accept values in any case matching Cash, Check, Credit, ACH, or Other. Other transaction types include other sources such as PayPal or Square.
-
Date:
-
The date and time will be formatted in ISO 8601 format, which consists of the 4-digit year, 2-digit month, 2-digit day, the capital letter "T", 2-digit hour, 2-digit minute, 2-digit second, and 4-digit timezone (which has either a plus or minus sign preceding it).
YYYY-MM-DDTHH:MM:SS(+/-):TM:ZN
2023-07-18T10:10:33-04:00 -
The standard aims to provide a well-defined, unambiguous method of representing calendar dates and times. If no timezone is specified in your file, then your local timezone will be used. A list of US timezone offsets is provided below:
-
EDT = -04:00
-
EST/CDT = -05:00
-
CST/MDT = -06:00
-
MST/PDT = -07:00
-
PST = -08:00
-
-
- Amount: The amount of the transaction must beat least 1 and less than 100,000,000.
- Fund ID: Fund IDs can be found on the Giving > Fund page in the portal.
- Appeal ID: Appeal IDs can be found on the Giving > Appeal page in the portal.
- Description: When the transaction Type is Other, the Description is required and may contain up to 50 characters. For all other transaction types, an optional description regarding your transaction may be entered.
-
Comments/Notes: An optional comment/note regarding your transaction may contain up to 500 characters.
-
Pledge ID: Pledge IDs can be found on the Reports > Pledge Report page in the portal
*NOTE: A Fund ID, Appeal ID, or Pledge ID is required for every transaction. It is recommended that you include only one of these IDs per transaction. For example, if you want to associate the transaction with a pledge, enter only the Pledge ID. If a Fund and/or Appeal ID are also entered which are not associated with the Pledge, an error will occur and the transaction will be be imported.
Begin Your Import
Once you have downloaded the template and added the information required for each transaction, return to the Data Import page. Click the purple Start Import button.
You should now see the window below:
Click the purple Choose File button and navigate to the local folder on your computer to select your completed .csv file. Click the Begin Import button to start importing the data. After the import starts, the system displays a message to confirm that you’ve begun the process. If there are any errors with the file, such as file type, missing or invalid column headers, or if the file is empty, an error will appear in the import window.
When the import finishes, the system sends you the results in an email message.
*NOTE: If you use Excel you should save your file in a .csv file format, but if you use a different spreadsheet program, you may have to export the file to a .csv file.
If all records in the file do not import successfully as indicated in the results email, you must fix the records with errors and begin the process again. In the second revision of the .csv file, you do not need to include any records that succeeded in the first attempt. If you do include successfully imported transactions, they will be marked as duplicates and ignored.
Results
If the import is successful, the email will indicate the number of new transactions imported successfully, and how many existing transactions were updated. If the import failed, the email will include a list of issues that occurred and on what line of the .csv file they occurred. For a detailed explanation of each error, visit Understanding Transaction Import Errors.
After you’ve successfully imported the list of transactions, you can view them on the Giving > Transactions page in your portal. The newly imported transactions will appear in the table with the value Import in the Source column. This lets you identify imported transactions quickly and easily.
You may filter your transactions table results solely by transactions with a source of Import by choosing the Filter By menu > Source > Import.
If you have any questions or need help, send us a note at communitysupport@factsmgt.com!
Comments
0 comments
Article is closed for comments.